What is Starter Solenoid
A starter solenoid is an essential component of a vehicle's starting system. It is an electromechanical device that serves as a relay between the vehicle's battery and the starter motor. When the ignition key is turned to the "start" position, an electrical current is sent to the starter solenoid, which then activates the starter motor.
The starter solenoid has two main functions. One is to start the motor. When the ignition key is turned to the "start" position, the solenoid uses an electromagnetic coil to create a magnetic field. This magnetic field pulls a plunger or lever, which in turn engages the starter motor's gears with the engine's flywheel or flexplate. This engagement allows the starter motor to turn the engine over and initiate the combustion process. And the other is to provide power for the starting motor. The solenoid also serves as a high-current switch, allowing a large amount of electrical current from the battery to flow to the starter motor. This current provides the necessary torque and rotational power to crank the engine.
Overall, the starter solenoid is responsible for initiating the starting process by engaging the starter motor and supplying it with sufficient power. It plays a crucial role in the overall functioning of a vehicle's engine starting system.
ALSO READ: What is a Solenoid Switch and How Does It Work?
Preparatory work
Safety measures:
1 Make sure the vehicle is parked and the parking brake is firmly up.
2 Turn off the engine and pull out the key to ensure that the vehicle is powered off.
3 Make sure the area you are working in is well ventilated.
Tools and Materials:
1 Screwdriver or wrench: The fixing screw or connector used to remove the electromagnet.
2 Voltmeter or multimeter: Used to measure the voltage of a circuit.
3 Insulated gloves and eye protection: Keep you safe.
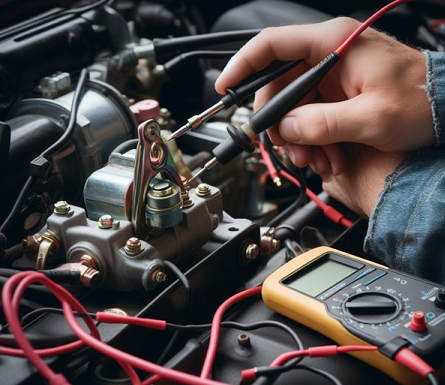
How to test a starter solenoid with a multimeter
To test a starter solenoid with a multimeter, you can follow these steps:
1. Ensure safety: Before starting any testing, make sure the vehicle is in a safe state, the engine is off, and the ignition is turned off.
2. Locate the solenoid: The starter solenoid is typically mounted on the starter motor or on the fender well.
3. Set up the multimeter: Set your multimeter to the resistance (ohms) mode. If your multimeter has multiple resistance ranges, select the lowest range.
4. Disconnect the solenoid: Disconnect the electrical connections from the solenoid to isolate it from the rest of the circuit.
5. Test the solenoid coil: Touch the multimeter probes to the two small terminals on the solenoid, usually labeled "S" and "I" (or "S" and "M"). The multimeter should display a resistance reading. If the reading is significantly different from the specified resistance value in the vehicle's service manual, the solenoid coil may be faulty.
6. Test the solenoid contacts: Touch one probe to the solenoid's battery terminal and the other probe to the solenoid's starter terminal. The multimeter should display a resistance reading. If the reading is significantly different from the specified resistance value in the service manual, the solenoid contacts may be faulty.
7. Test the solenoid for continuity: Set your multimeter to the continuity mode (often represented by a sound wave symbol). Touch one probe to the solenoid's battery terminal and the other probe to the solenoid's starter terminal. You should hear a beep or see a continuity indication on the multimeter. If there is no continuity, the solenoid is likely faulty.
Remember, the specific testing procedure may vary depending on the vehicle make and model. It's always a good idea to consult the vehicle's service manual or seek assistance from a professional mechanic if you are unsure about the testing process.
Here is an useful video:
Testing a Starter Solenoid Using a Screwdriver
The principle of testing a starter solenoid using a screwdriver
The principle of testing a starter solenoid using a screwdriver involves directly connecting the two terminals of the solenoid to activate the starter. When you bridge the two terminals of the solenoid with a screwdriver, current flows through the solenoid's coil, causing the solenoid to engage. This simulates the working process of the starter during normal operation and helps determine if the solenoid is functioning properly.
Steps for testing a starter solenoid using a screwdriver
Please proceed with caution, ensuring safety and following the steps below:
1 Ensure the vehicle is in a parked position and disconnect the power:
Turn off the engine and remove the car key to ensure the vehicle is completely powered off.
Disconnect the negative terminal of the battery to prevent accidental starting.
2 Locate the starter solenoid:
Identify the location of the starter solenoid based on the manufacturer and model of the vehicle. Typically, it is located in the engine compartment, near the bottom of the engine.
3 Prepare a screwdriver:
Wear insulated gloves for safety and prepare an insulated-handle screwdriver.
4 Bridge the solenoid terminals:
Locate the two terminals on the solenoid, usually two metal screws or pins.
Use the insulated-handle screwdriver to bridge/connect these two terminals. Ensure the metal part of the screwdriver makes contact with both terminals.
5 Observe the solenoid's response:
After bridging the connection, the solenoid should engage, emitting a distinct clicking sound, and you may feel it vibrating.
If the solenoid doesn't respond at all or only produces a faint sound or vibration, it may indicate a problem with the solenoid.
Precautions:
Keep your hands and body clear of the moving parts of the solenoid while performing this test to prevent injuries.
Use insulated gloves and eye protection to ensure personal safety.
If you are unsure about how to perform this test, it is best to consult a professional or seek expert technical support.
Please note that the screwdriver testing method provides a preliminary check of the solenoid's operation but does not provide detailed fault diagnosis. If you suspect a problem with the solenoid, it is recommended to consult a professional for more detailed testing and troubleshooting.
Signs of a bad starter solenoid and how to fix
Common starter solenoid failures include the engine not starting, slow engine startup, clicking or grinding noises from the engine, and solenoid relay coil overheating.
If you encounter symptoms of a starter solenoid failure, you can try the following troubleshooting steps:
Check the battery: Ensure the battery is fully charged and properly connected without corrosion or looseness.
Inspect the power supply circuit: Check the power supply circuit of the starter solenoid relay, ensuring the wiring is securely connected and undamaged.
Check the solenoid relay coil: Use a multimeter to test the solenoid relay coil, ensuring it is receiving power and the resistance value falls within the normal range.
Inspect the relay contacts: If you find corroded or damaged relay contacts, you can try cleaning them or replacing the relay.
Check the starter solenoid relay circuit: Use a multimeter to test the starter solenoid relay circuit, ensuring there is a voltage change during startup.
Inspect the mechanical components of the starter solenoid: Check the mechanical components of the starter solenoid, such as springs, linkages, and gears, ensuring they are not loose, damaged, or stuck.
If the above troubleshooting steps do not resolve the issue, it is advisable to seek assistance from a professional technician who can perform more detailed inspections and repairs. Remember to ensure the vehicle is in a safe state and the power is disconnected before performing any troubleshooting to prevent electrical shock and damage to electronic equipment.
ALSO READ: How to Test Ignition Coil with Multimeter